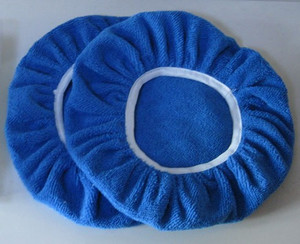
7" Premium Microfiber Bonnet for 6"-7" orbital polisher pads.
80% polyester and 20% polyamide
This is the best quality microfiber bonnet that I have ever used. It works very well for removing oxidation, polishing, waxing, and wax removal.
They are priced at a value point, but don't buy them because they are cheap, buy them because they are excellent.
I use them as follows to polish/wax automobiles and boats. I highly prefer this method to using a "rotary" buffer as it is the best for your paint/gelcoat. It also conserves chemical and eliminates swirl marks. We are trying to use the chemical to remove the oxidation, not use the rotary buffer to grind down your paint. I have a rotary buffer, but I no longer use it. If the oxidation is severe enough to even consider a rotary buffer, then the surface needs to be wet sanded. After wet sanding follow the same buffing process below to remove the scratches left behind by the wet sand paper bringing the finish to like-new.
The process is either a 3 step process or a 4 step process depending upon how oxidized the vehicle is. The steps are 1) compound, 2) polish/oxidation removal, 3) wax, 4) buff off the wax. For normal vehicles, the compound step is not necessary. It is the same as the polish/oxidation removal step, but with compound.
Place 2 bonnets on the orbital buffer. The purpose of the top bonnet is to hold the chemical. The purpose of the bottom bonnet is to keep the orbital polisher clean.
Assuming the 3 step process, start with the oxidation remover/polish. Spin the buffer and apply a "swirl" of chemical to the bonnet. Then "buff" an area about the size of 1/2 of the hood of an automobile. Figure a square area. Make an "X" in the square first to evenly distribute the chemical. Then go over the square up and down, then again left and right. Let the buffer gently "massage" the chemical into the paint. The bonnet will absorb the oxidation and dead paint. The idea is to let the chemical do the work, not to "hone" the paint/gelcoat. This is not a brute force operation.
Once the first area is done, flip the top bonnet to reveal its other side. Repeat on another area. Then replace the top bonnet with a fresh bonnet. The quality of the paint/gelcoat will determine how long these bonnets will last before switching, but error on the side of going to a fresh one. Again, the idea is to pull the oxidation/dead paint away from the finish, not to grind it into it.
Once finished with the vehicle, wipe off any residue with a microfiber towel. Then remove both bonnets.
Get 2 fresh bonnets and put them on the buffer. Apply some wax to the buffer. I prefer a paste wax. Using the buffer, apply the wax to an area about the same size as 1/2 of an automobile hood. Then add more wax to the same bonnet and do another section. One bonnet should go a very long way as the car is now clean. The bonnet will get saturated with wax.
When done applying the wax remove both bonnets and replace with 2 fresh bonnets.
The final step is to buff the wax off of the vehicle. Most waxes are buffed off after they dry. However, some are buffed off while still wet like Zymol. If you are using a product like that, it might be easier to have a second buffer already loaded with clean bonnets to perform this buffing step before the chemical dries.
If you are going to compound first, the process is the same as the oxidation remover, but with compound. Then after the compound, do the oxidation removal/polish, then the wax and buff.


